Cake (14x14x8)
Made from 2 rectangles with hinges
(see also my minecraft creeper pattern)
rectangle A
start with brown
0 chain
15
1-4 14sc, ch1, turn (4 times in
total)
5 keep the yarn on facing side: when turning to brown leave long tail for sewing
(turn to white, 2sc, turn to brown, 2sc)
3 times, turn to white, 2sc
6-8 14sc, ch1, turn (3 times in total)
9
14sc in front loops only, ch1, turn
10-22 14sc,
ch1, turn (13 times in total)
23 14sc in front loops only, ch1,
turn
24-25 14sc, ch1, turn (2 times in total)
26 (2sc, turn to brown, 2sc, turn to white) 3 times, 2sc white
27-30 turn to brown, 14sc, ch1, turn (4 times in
total)
rectangle B
start with white
0 chain 15
1-3 14sc, ch1, turn (3 times in total)
4 (2sc, turn to brown, 2sc) 3 times, turn to white, 2sc, leave long white tail for sewing
5-8 turn to brown, leave long tail for sewing, 14sc, ch1, turn (4 times in total)
9 14sc in front loops only, ch1, turn
10-22 14sc, ch1, turn (13 times in total)
23 14sc in front loops only, ch1, turn
24-26 14sc, ch1, turn (3 times in total)
27 (turn to white, 2sc, turn to brown) 3 times, turn to white, 2sc
28-30 14sc, ch1, turn (3 times in total)
Cake embroidery
Embroider the cake like the picture below. You could also crochet the spots, but I chose embroidery.
Sew A&B together to form a cube, stuff. See schematic for help.
Make sure the 'hinges' as explained above are in the correct way.
This means that if you lay down the 2 rectangles, the unused front/back loops should be in the back (you are not facing them). Also the embroided side is facing down.
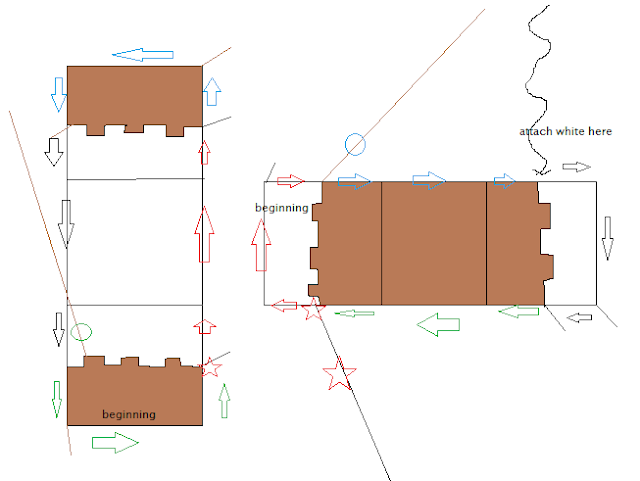 Begin at the red star sewing with
white and follow the sides, switching to brown and back to white again. Attach a white strand where indicated to continue closing
the cube. Stuff but don't overstuff.
Begin at the red star sewing with
white and follow the sides, switching to brown and back to white again. Attach a white strand where indicated to continue closing
the cube. Stuff but don't overstuff.
*****
Note: You may NOT use this pattern, or the cakes produced following the pattern for commercial/retail purposes. You are free to use this pattern to make as many cakes as
you like for personal use/gifts. Please do not post this pattern anywhere else.
If you follow my pattern and blog about it I would appreciate a link back to my
blog (so others can make it too!).
*****


