My Galaxy S2 has an annoying thing: apps are stored in the system memory and this system memory is relatively very very small, it's about 1/10 of my total device memory. You can install more apps if you make use of external memory (you need a SD card because the annoying thing will not use the device memory,even if it's 16Gig) however it will still need to store a part of the app in the system memory. If the system memory is 200Mb or smaller, the apps don't even want to install or update anymore! And changing the size of the system memory can only be done if you root the phone, which is something I am not willing/wanting to do.
Also after some time installing and deleting apps, it looked like my system memory was loosing space. Less apps were installed but still I had almost no system memory left.
It appears that even after de-installing, apps leave some data behind in your system memory.
So, this is how you can free more system memory, without having the need of rooting your phone:
1. Go to the phone function
2. enter: *#9900# , you are now in the Sysdump
3. select option 2 (delete dumpstate/logcat
4. when prompted "Delete Dump!" press OK
5. exit the sysdump
6. check your storage! :)
You will see that a lot of memory is now back in your possession :)
But if you want to install a lot of apps, a SD card will still be needed.
Monday, October 5, 2015
Thursday, October 1, 2015
Functie symbolen van de whirlpool combi oven
De handleiding die bij mijn combi oven whirlpool AMW 820 IX zit, is totaal niet informatief.
Alleen de functie wordt genoemd, maar niet welk symbooltje er nu bij hoort. Want wat is nu snel voorverwarmen? En volgens de deur heb ik auto-crisp, maar ik kan het echt niet vinden.
En ook geen informatie of je het rekje nu wel of niet bij de crisp functie mag of moet gebruiken..
Na een paar maanden gebruik ben ik erachter, dus hieronder mijn overzicht van de functies.
Intussen heeft whirlpool ook eindelijk naar de klachten geluisterd, en een duidelijkere handleiding gemaakt (zie hier). Stukken beter, maar nog geen algemeen overzicht. Die vind je dus hieronder.
 Functie: Magnetron EN Jet start
Waar: Linkerdraaiknop op 1e positie naar rechts
Hoe voor de Jet: druk meteen op de starttoets
Wat: glasplaat

Functie: Crisp (manueel)
Waar: Linkerdraaiknop op 2e positie naar rechts
Wat: crispplaat op glasplaat

Functie: Grill
Waar: Linkerdraaiknop op 3e positie naar rechts
Wat: alles behalve crispplaat

Functie: Grill & magnetron combi
Waar: Linkerdraaiknop op 4e positie naar rechts
Wat: glasplaat of rekje op glasplaat

Functie: Turbogrill
Waar: Linkerdraaiknop op 5e positie naar rechts
Wat: glasplaat of rekje of glasplaat

Functie: Hete lucht oven
Waar: Linkerdraaiknop op 6e positie naar rechts
Wat: alles mag

Functie: Hete lucht oven - Magnetron combi
Waar: Linkerdraaiknop op 7e positie naar rechts
Wat: rekje op glasplaat

Functie: Snel voorverwarmen
Waar: Linkerdraaiknop op 8e positie naar rechts
Wat: glasplaat, maar mag geen eten bevatten
Nu wordt het wat complexer: de volgende functie (defro) heeft namelijk een heel extra menu onder zich, namelijk alle "auto" functies. Deze kan je selecteren door de rechterdraaiknop te gebruiken als je op "defro" staat. Ja dat wist ik eerst ook niet, erg verdekt opgesteld.

Functie: automatisch ontdooien (jet defrost)
Waar: Linkerdraaiknop op 2e positie naar links OF
Waar: Linkerdraaiknop op 9e positie naar rechts
Wat: glasplaat
 Functie: Heropwarmen
Waar: eerst naar defro (linkerknop 2e positie naar links)
daarna rechterknop 1x naar rechts draaien.
Wat: glasplaat
 Functie: Automatische crisp (zie deur voor nummers)
Waar: eerst naar defro (linkerknop 2e positie naar links)
daarna rechterknop 2x naar rechts draaien.
Wat: crispplaat op glasplaat
 Functie: Automatische oven-magnetron (zie deur voor nummers)
Waar: eerst naar defro (linkerknop 2e positie naar links)
daarna rechterknop 3x naar rechts draaien.
Wat: alles behalve cripsplaat
Veel succes en plezier met alle functies die je nu weet te vinden :)
Alleen de functie wordt genoemd, maar niet welk symbooltje er nu bij hoort. Want wat is nu snel voorverwarmen? En volgens de deur heb ik auto-crisp, maar ik kan het echt niet vinden.
En ook geen informatie of je het rekje nu wel of niet bij de crisp functie mag of moet gebruiken..
Na een paar maanden gebruik ben ik erachter, dus hieronder mijn overzicht van de functies.
Intussen heeft whirlpool ook eindelijk naar de klachten geluisterd, en een duidelijkere handleiding gemaakt (zie hier). Stukken beter, maar nog geen algemeen overzicht. Die vind je dus hieronder.

Waar: Linkerdraaiknop op 1e positie naar rechts
Hoe voor de Jet: druk meteen op de starttoets
Wat: glasplaat

Functie: Crisp (manueel)
Waar: Linkerdraaiknop op 2e positie naar rechts
Wat: crispplaat op glasplaat

Functie: Grill
Waar: Linkerdraaiknop op 3e positie naar rechts
Wat: alles behalve crispplaat

Functie: Grill & magnetron combi
Waar: Linkerdraaiknop op 4e positie naar rechts
Wat: glasplaat of rekje op glasplaat

Functie: Turbogrill
Waar: Linkerdraaiknop op 5e positie naar rechts
Wat: glasplaat of rekje of glasplaat

Functie: Hete lucht oven
Waar: Linkerdraaiknop op 6e positie naar rechts
Wat: alles mag

Functie: Hete lucht oven - Magnetron combi
Waar: Linkerdraaiknop op 7e positie naar rechts
Wat: rekje op glasplaat

Functie: Snel voorverwarmen
Waar: Linkerdraaiknop op 8e positie naar rechts
Wat: glasplaat, maar mag geen eten bevatten
Nu wordt het wat complexer: de volgende functie (defro) heeft namelijk een heel extra menu onder zich, namelijk alle "auto" functies. Deze kan je selecteren door de rechterdraaiknop te gebruiken als je op "defro" staat. Ja dat wist ik eerst ook niet, erg verdekt opgesteld.

Functie: automatisch ontdooien (jet defrost)
Waar: Linkerdraaiknop op 2e positie naar links OF
Waar: Linkerdraaiknop op 9e positie naar rechts
Wat: glasplaat

Waar: eerst naar defro (linkerknop 2e positie naar links)
daarna rechterknop 1x naar rechts draaien.
Wat: glasplaat

Waar: eerst naar defro (linkerknop 2e positie naar links)
daarna rechterknop 2x naar rechts draaien.
Wat: crispplaat op glasplaat

Waar: eerst naar defro (linkerknop 2e positie naar links)
daarna rechterknop 3x naar rechts draaien.
Wat: alles behalve cripsplaat
Veel succes en plezier met alle functies die je nu weet te vinden :)
Life hack posts
Ik google vaak naar oplossingen of zoek of mensen ook ervaring hebben met bepaalde dingen. Vind het dan altijd erg fijn dat mensen over de meest uiteenlopende dingen posten. Soms vind ik niets en als ik dan zelf wat heb uitgevogeld denk ik 'hmmm ik zou dit ook ergens moeten posten voor het geval dat iemand anders zich hetzelfde af heeft gevraagd'.
Dus vanaf nu: label Life Hacks, voor alle handigheidjes of andere dingen waar ik tegenaan ben gelopen.
Dus vanaf nu: label Life Hacks, voor alle handigheidjes of andere dingen waar ik tegenaan ben gelopen.
Wednesday, December 24, 2014
Free Pattern: The Snowman (Raymond Briggs inspired)
I really love the "The Snowman" animation film. The music, the way is it drawn..
So time for a Raymond Briggs inspired snowman! :)

The body, head, hat and scarf I made with 8 ply acrylic wool (hooksize 4.0 mm). My snowman measures around 16 cm tall.
Eyes (make 2): 3 sc in magic ring, 1 sc, finish off
Nose (make 1): 4 sc in magic ring, 1sc, finish off
Buttons (make 3): 4 sc in magic ring, finish off
BODY (with white)
Work in spirals, do not join rounds.
Rnd 1: 5sc in magic ring
Rnd 2: 2sc in every st (10)
Rnd 3: *2sc in st, 1sc * repeat (15)
Rnd 4: *2sc in st, 2sc * repeat (20)
Rnd 5: *2sc in st, 3sc * repeat (25)
Rnd 6: *2sc in st, 4sc* repeat (30)
Rnd 7: *2sc in st, 5sc* repeat (35)
Rnd 8: *2sc in st, 6sc* repeat (40)
Rnd 9 - 13: 40 sc (this is 5x)
Rnd 14: *sc in 2st (dec), 6sc* repeat (35)

Rnd 1: 5sc in magic ring
Rnd 2: 2sc in every st (10)
Rnd 3: *2sc in st, 1sc * repeat (15)
Rnd 4: 15 sc
Rnd 5: *2sc in st, 2sc * repeat (20)
Rnd 6: 20 sc
Rnd 7: *2sc in st, 3sc * repeat (25)
Rnd 8- 10: 25 sc (this is 3x)
Rnd 11: *sc in 2st (dec), 3sc* repeat (20)
stuff and sew on eyes, nose and embroider mouth
Rnd 14: *sc in 2st (dec), 1sc* repeat (10)
leave tail for sewing on body
Rnd 1: 5sc in magic ring
Rnd 2: 2sc in every st (10)
Rnd 3: *2sc in st, 1sc * repeat (15)
Rnd 4: *2sc in st, 2sc * repeat (20)
Rnd 5: *2sc in st, 3sc * repeat (25)
Rnd 6: in outer loop: 25 sc
Rnd 7 - 8: 25 sc
Rnd 9: *2sc in st, 5sc* repeat (30)
Rnd 10: 30 FPHsc
Turn hat inside out.
turn, hdc in outer loop of each st, chain 1
turn, hdc in outer loop of each st, chain 1
continue until scarf is of sufficient length
Enjoy your snowman ^^
So time for a Raymond Briggs inspired snowman! :)
The body, head, hat and scarf I made with 8 ply acrylic wool (hooksize 4.0 mm). My snowman measures around 16 cm tall.
The eyes, nose and buttons I made with
cotton (hooksize 2.5mm). If you use
wool/acrylic, the dimensions may be off, but then you just need to play around
a bit.
Eyes (make 2): 3 sc in magic ring, 1 sc, finish off
Nose (make 1): 4 sc in magic ring, 1sc, finish off
Buttons (make 3): 4 sc in magic ring, finish off
BODY (with white)
Work in spirals, do not join rounds.
Rnd 1: 5sc in magic ring
Rnd 2: 2sc in every st (10)
Rnd 3: *2sc in st, 1sc * repeat (15)
Rnd 4: *2sc in st, 2sc * repeat (20)
Rnd 5: *2sc in st, 3sc * repeat (25)
Rnd 6: *2sc in st, 4sc* repeat (30)
Rnd 7: *2sc in st, 5sc* repeat (35)
Rnd 8: *2sc in st, 6sc* repeat (40)
Rnd 9 - 13: 40 sc (this is 5x)
Rnd 14: *sc in 2st (dec), 6sc* repeat (35)
Rnd 15 - 18: 35 sc (this is 4x)
Rnd 19: *sc in 2st (dec), 5sc* repeat (30)
Rnd 19: *sc in 2st (dec), 5sc* repeat (30)
Rnd 20 - 25: 30 sc (this is 6x)
Rnd 21: in inner loop: *sc in 2st (dec), 4sc* repeat (25)
Rnd 22: *sc in 2st (dec), 3sc* repeat (20)
Rnd 21: in inner loop: *sc in 2st (dec), 4sc* repeat (25)
Rnd 22: *sc in 2st (dec), 3sc* repeat (20)
stuff and sew on buttons
Rnd 23: *sc in 2st (dec)* repeat (10)
Rnd 24: *sc in 2st (dec)* repeat (5)
Create the illusion of arms by sewing the
sides together on each side, leaving a little tube/arm. Start about 2 cm from below.
The back and front of the body do not need to touch each other, so you do not
need to very pull hard. Just create an indent. Continue until you are happy with the length
of the arms.
HEAD (with white)
Work in spirals, do not join rounds.Rnd 1: 5sc in magic ring
Rnd 2: 2sc in every st (10)
Rnd 3: *2sc in st, 1sc * repeat (15)
Rnd 4: 15 sc
Rnd 5: *2sc in st, 2sc * repeat (20)
Rnd 6: 20 sc
Rnd 7: *2sc in st, 3sc * repeat (25)
Rnd 8- 10: 25 sc (this is 3x)
Rnd 11: *sc in 2st (dec), 3sc* repeat (20)
stuff and sew on eyes, nose and embroider mouth
Rnd 12: *sc in 2st (dec), 2sc* repeat (15)
Rnd 13: 15 scRnd 14: *sc in 2st (dec), 1sc* repeat (10)
leave tail for sewing on body
HAT (with green)
Work in spirals, do not join rounds.Rnd 1: 5sc in magic ring
Rnd 2: 2sc in every st (10)
Rnd 3: *2sc in st, 1sc * repeat (15)
Rnd 4: *2sc in st, 2sc * repeat (20)
Rnd 5: *2sc in st, 3sc * repeat (25)
Rnd 6: in outer loop: 25 sc
Rnd 7 - 8: 25 sc
Rnd 9: *2sc in st, 5sc* repeat (30)
Rnd 10: 30 FPHsc
Turn hat inside out.
fyi: (FPHsc) Front Post Half Stitch: yo (yarn over) your hook; starting
from the front, place hook from front to back to front around the post
of st (stitch) in row below; complete as a hdc (half double crochet)
SCARF (with
green) (with green)
chain 4turn, hdc in outer loop of each st, chain 1
turn, hdc in outer loop of each st, chain 1
continue until scarf is of sufficient length
sew head on body, wrap scarf around neck
and put on hat.
*****
Note: You may NOT use this pattern, or the snowmen produced using the pattern for commercial/retail purposes. You are free to use this pattern to make as many snowmen as you like for personal use/gifts. Please do not post this pattern anywhere else or claim it as your own. If you use my pattern and blog about it I would appreciate a link back to my blog (so others can make it too! =)).
*****
Saturday, October 6, 2012
My first bags
About 2,5 years ago I got a sewing machine for my birthday. Not until a half year ago it was sitting in our "clutter room", gathering dust. But after seeing some very cool dresses in Barcelona (and my mum telling me that those are easily made yourself as well), I wanted to give sewing a try.
Before trying dresses, I thought I start easy by making some bags first.
And I guess I can sew too! :) My first attempt (fabric from Ikea) was already a great success and I even managed to get a zipper in the lining.

The first day I used my bag, I got 2 requests from friends to make a bag for them as well.
So, why not? It was great practice:


After these smaller handbags, I wanted a bigger one for myself, so I created a pattern for a big handbag (or small beachbag). And ofcourse, a pouch with zipper in the lining (to keep my purse safe!).

Next will be a bag with zipper closure, because I noticed that I do like a handbag which I can close completely (to keep my possessions even safer :))
Now I have enough experience to start trying out dress patterns!
Saturday, May 26, 2012
Free Pattern: Minecraft Cake

Yum yum, cake!
Make now your own minecraft goodie.
No need to strengthen the
sides to obtain& maintain cubic form as this pattern is using 2 rectangles
to make the cube instead of working in the
round.
In the rectangles 'hinges' are created by working one row in the front or back loops only. By working in the front row, the hinge will be towards you. The back row will be the opposite.
In the rectangles 'hinges' are created by working one row in the front or back loops only. By working in the front row, the hinge will be towards you. The back row will be the opposite.
Cake (14x14x8)
Made from 2 rectangles with hinges
(see also my minecraft creeper pattern)
rectangle A
start with brown
0 chain 15
1-4 14sc, ch1, turn (4 times in total)
5 keep the yarn on facing side: when turning to brown leave long tail for sewing
rectangle A
start with brown
0 chain 15
1-4 14sc, ch1, turn (4 times in total)
5 keep the yarn on facing side: when turning to brown leave long tail for sewing
(turn to white, 2sc, turn to brown, 2sc)
3 times, turn to white, 2sc
6-8 14sc, ch1, turn (3 times in total)
9 14sc in front loops only, ch1, turn
10-22 14sc, ch1, turn (13 times in total)
23 14sc in front loops only, ch1, turn
24-25 14sc, ch1, turn (2 times in total)
26 (2sc, turn to brown, 2sc, turn to white) 3 times, 2sc white
6-8 14sc, ch1, turn (3 times in total)
9 14sc in front loops only, ch1, turn
10-22 14sc, ch1, turn (13 times in total)
23 14sc in front loops only, ch1, turn
24-25 14sc, ch1, turn (2 times in total)
26 (2sc, turn to brown, 2sc, turn to white) 3 times, 2sc white
27-30 turn to brown, 14sc, ch1, turn (4 times in
total)
rectangle B
start with white
0 chain 15
1-3 14sc, ch1, turn (3 times in total)
4 (2sc, turn to brown, 2sc) 3 times, turn to white, 2sc, leave long white tail for sewing
5-8 turn to brown, leave long tail for sewing, 14sc, ch1, turn (4 times in total)
9 14sc in front loops only, ch1, turn
10-22 14sc, ch1, turn (13 times in total)
23 14sc in front loops only, ch1, turn
24-26 14sc, ch1, turn (3 times in total)
27 (turn to white, 2sc, turn to brown) 3 times, turn to white, 2sc
28-30 14sc, ch1, turn (3 times in total)
Cake embroidery
Embroider the cake like the picture below. You could also crochet the spots, but I chose embroidery.

Sew A&B together to form a cube, stuff. See schematic for help.
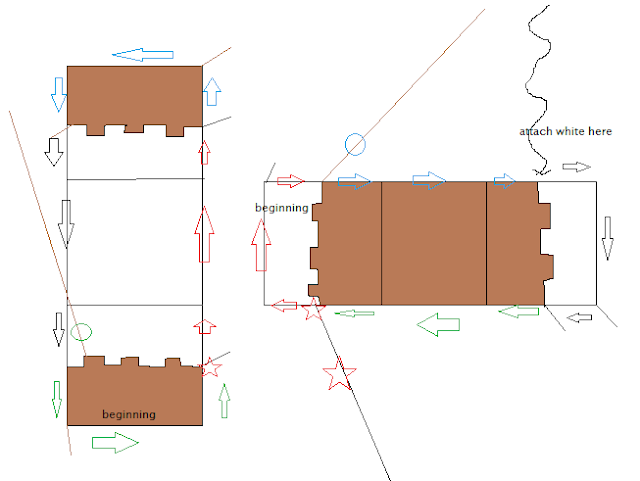
Begin at the red star sewing with white and follow the sides, switching to brown and back to white again. Attach a white strand where indicated to continue closing the cube. Stuff but don't overstuff.
Make sure the 'hinges' as explained above are in the correct way.
This means that if you lay down the 2 rectangles, the unused front/back loops should be in the back (you are not facing them). Also the embroided side is facing down.
This means that if you lay down the 2 rectangles, the unused front/back loops should be in the back (you are not facing them). Also the embroided side is facing down.

Begin at the red star sewing with white and follow the sides, switching to brown and back to white again. Attach a white strand where indicated to continue closing the cube. Stuff but don't overstuff.
*****
Note: You may NOT use this pattern, or the cakes produced following the pattern for commercial/retail purposes. You are free to use this pattern to make as many cakes as you like for personal use/gifts. Please do not post this pattern anywhere else. If you follow my pattern and blog about it I would appreciate a link back to my blog (so others can make it too!).
*****
Wednesday, May 23, 2012
Free Pattern: Minecraft Magma Cube & Slime

Make your own cute minecraft magma cube or slime critter!
Small: 8x8x8
Medium: 12x12x12
Any size: see schematic
No need to strengthen the sides to obtain& maintain cubic form as this pattern is using 2 rectangles to make the cube instead of working in the round.
In the rectangles 'hinges' are created by working one row in the front or back loops only. By working in the front row, the hinge will be towards you. The back row will be the opposite.
Cube Small (8x8x8)
0 chain 9
1-8 8sc, ch1, turn (8 times in total)
9 8sc in front loops only, ch1, turn
10-16 8sc, ch1, turn (7 times in total)
17 8c in front loops only, ch1, turn
18-24 8sc, ch1, turn (7 times in total)

1-12 12sc, ch1, turn (12 times in total)
13 12sc in front loops only, ch1, turn
14-24 12sc, ch1, turn (11 times in total)
25 12sc in front loops only, ch1, turn
26-36 12sc, ch1, turn (11 times in total)
0 chain (X +1)
X sc, ch1, turn (X times in total)
X sc in front loops only, ch1, turn
X sc, ch1, turn ( (X -1) times in total)
X sc in front loops only, ch1, turn
X sc, ch1, turn ( (X -1) times in total)
make two, embroider the eyes, sew together to form a cube, stuff. See schematic for help.
1-8 8sc, ch1, turn (8 times in total)
9 8sc in front loops only, ch1, turn
10-16 8sc, ch1, turn (7 times in total)
17 8c in front loops only, ch1, turn
18-24 8sc, ch1, turn (7 times in total)
make two, embroider the eyes, sew together to form a cube, stuff. See schematic for help.
Make sure the 'hinges' as explained above are in the correct way.
This means that if you lay down the 2 rectangles, the unused back loops should be in the back (you are not facing them).
This means that if you lay down the 2 rectangles, the unused back loops should be in the back (you are not facing them).

Cube Medium (12x12x12)
0 chain 131-12 12sc, ch1, turn (12 times in total)
13 12sc in front loops only, ch1, turn
14-24 12sc, ch1, turn (11 times in total)
25 12sc in front loops only, ch1, turn
26-36 12sc, ch1, turn (11 times in total)
make two, embroider the eyes, sew together to form a cube, stuff. See schematic for help.
Make sure the 'hinges' as explained above are in the correct way.
This means that if you lay down the 2 rectangles, the unused back loops should be in the back (you are not facing them)
Cube Any size (XxXxX)This means that if you lay down the 2 rectangles, the unused back loops should be in the back (you are not facing them)
0 chain (X +1)
X sc, ch1, turn (X times in total)
X sc in front loops only, ch1, turn
X sc, ch1, turn ( (X -1) times in total)
X sc in front loops only, ch1, turn
X sc, ch1, turn ( (X -1) times in total)
make two, embroider the eyes, sew together to form a cube, stuff. See schematic for help.
Make sure the 'hinges' as explained above are in the correct way.
This means that if you lay down the 2 rectangles, the unused back loops should be in the back (you are not facing them)
This means that if you lay down the 2 rectangles, the unused back loops should be in the back (you are not facing them)
Eyes
Embroider the eyes like these patterns.

 What I normally do is first make all vertical stripes and then finish it off with 2 horizontal bars on top and bottom.
*****
Note: You may NOT use this pattern, or the magma cubes/slimes produced following the pattern for commercial/retail purposes. You are free to use this pattern to make as many Magma Cubes and Slimes as you like for personal use/gifts. Please do not post this pattern anywhere else. If you follow my pattern and blog about it I would appreciate a link back to my blog (so others can make it too!).
*****
Subscribe to:
Posts (Atom)